
The WarmMe: The Safe Car Seat Winter Coat Alternative
Last updated on July 6th, 2025 at 03:26 pm
 In the Winter of 2012, I found myself as a first time mom of a beautiful 6 month old baby girl and I had a problem. We had moved my daughter out of her infant car seat and into a convertible car seat, she was just too heavy to carry around in the infant seat. The problem was it was winter and I didn’t know how to keep her warm while also keeping her safe in her new seat. I had read many articles and seen many graphics online about the dangers of using a winter coat under the straps of car seat harness.
A winter coat is too bulky to safely and securely use under a car seat harness. We did the quick test suggested in multiple articles, put the child in their coat and secure the harness straps, tightening them until they feel snug, then take the child out of the seat and remove their coat, put them back in and buckle the straps. We were shocked by the results, we were certain the straps had been tight when the coat was one, but once the coat was removed there was so much slack in the straps! In the case of a car accident, the force from the accident would cause the child’s winter coat to compress against the straps and the result would be gaping, loose straps that a child could slip through. More recently (January 8, 2024), Consumer Report issued a report and video on this exact danger. They suggest removing the child’s coat and putting it over them like a blanket once they are secured in the car seat, or using a blanket to cover the child.
 So, how would we keep our little girl warm throughout a cold Michigan winter? We tried multiple options including putting her coat or snowsuit on in the house and removing in the car then putting it over her once she was buckled. We tried layering blankets over her once she was buckled. We tried lightweight sweatshirts under the straps. None of these options were convenient or warm, taking the coat on and off was probably the most time consuming, the blankets didn’t stay on, and the sweatshirts just weren’t warm enough. That’s when I knew there had to be a warm and safe alternative to the winter coat. I decided to make something as warm as a blanket that would stay on without the need for removing in the car. I thought that something like a poncho would work the best, and so the first version of the The WarmMe was born.
The first version of The WarmMe was very basic, it kept my daughter warm and safe in the car, so it served it’s purpose but I felt there were improvements that could be made. The WarmMe had a single button on the front to secure it and made opening the front simple and easy for securing the car seat harness underneath. The first WarmMe was made of a fleece lined sherpa material that was cute and cuddly, but pricey plus very limited on color selection. The WarmMe worked well that first winter, so the next winter I made an identical one that was just a bit larger to fit my quickly growing daughter.
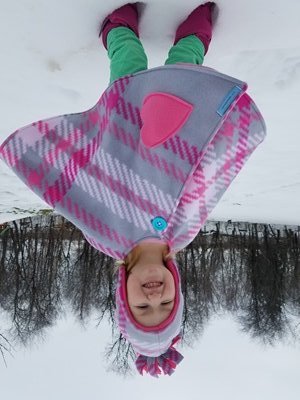 This second winter my daughter was becoming more independent and always wanting to walk rather than be carried, even on cold and windy winter days. I noticed that on a windy day her WarmMe would blow open when she was walking around outside. I decided to add something special that sets The WarmMe apart from other ponchos and kept my little girl warm even on windy days-by a special feature, interior pockets. The pockets on the inside allowed my daughter to keep her hands warm and also wrap The WarmMe around herself when she was wearing it outside of the car. Her second winter, my daughter loved her new and improved WarmMe with the added pockets. This was also when I decided to change the material from the sherpa to fleece. Fleece is much easier to work with especially when adding the pockets, has endless color and print combinations available, and is easily washable (a definite bonus when creating something for little kids!).
People stopped us all the time asking where were got The WarmMe and when I said I made it they started encouraging me to sell them. At this point in time I had two young children and was working part time as a school social worker, adding to a small business to my already full and busy life didn’t seem to make sense to me. Plus, my whole goal was to keep my daughters safe in the car, how could I put a price on that?
 In October 2015 my life changed. I suffered a traumatic miscarriage. As our dream of adding a 3rd baby to our family was crushed and I was left in the most physical and emotional pain I have ever experienced, I found myself needing something I was passionate about to get me out of the dark place I was stuck in. At this point I had made a couple WarmMes as gifts for friends and family and the feedback was great, they loved how much easier it made everyday life. That’s when I went for it, I decided to take a chance and put them up for sale, as I realized I could reach a lot of parents and caregivers who were looking for a safe way to keep their little ones warm. The business started very small, just a couple postings on my personal Facebook page that were then shared by my family and friends.
Each WarmMe has always been custom made based on the child’s clothing size and the print or color preference, so I just focused on completing each order as it came in. People soon started asking for added features such as an attached hood. After asking around and doing a little experimenting I decided a hood is just too bulky to be comfortable behind a child’s head and neck while riding in the car. I decided to start offering matching hats and they’ve been a hit! The next request was for matching scarves for the mom or dad and that option was quickly added in what I like to call the “Mommy and Me Set.”
In February 2016, The WarmMe was featured on a segment called “Moms a Genius” on WXYZ Detroit and the business picked up from there. I could no longer keep up with orders on my own, so my wonderful and supportive husband stepped in to help. In 2017, The WarmMe made the news again on my local news station WLNS 6 out of Lansing, MI and has been picked up by other stations in states such as South Carolina, North Carolina, W isconsin, Indiana, Minnesota, Ohio, New York, and Virginia. This holiday season The WarmMe has been sent to cold states all over the map. The best part of the increased business has been the feedback from happy customers. Almost daily I receive messages stating how much parents and children alike love The WarmMe and how it has made life easier by keeping little ones safe and warm! It is amazing knowing that my product is making life a little easier for parents, while keeping their precious little ones safe! I’m very happy to say that both The WarmMe business and our family are growing as we are expecting the newest addition to our family in January 2017!
HEALTHFUL HINTS:
- While the WarmMe is designed to young children safe and warm in their car seats, there are also products designed to fit safely over infant seats while not interfering with the ability to securely buckle the harness. These products are ones that do not go between the child and the car seat or buckles, but go over the seat similar to a shower cap.
- If taking a long road trip or traveling far from home when road or weather conditions are really bad (remember, I’m talking Michigan winters!) take along coats, snowpants, or snowsuits. If something were to happen and you ended up stranded these items would definitely help keep your little one warm until help arrived.
- Remember safe sleep precautions when using The WarmMe, similar products, or blankets to keep your child warm in the car seat. Always be sure the fabric is away from their face allowing for an open airway. If transferring a sleeping child from the car into their bed always remove The WarmMe.
- Here is the official Consumer Reports recommended “simple way to check if your child’s coat is too big and bulky to wear under their harness”
- Put the coat on your child, sit them in the child seat and fasten the harness. Tighten the harness until you can no longer pinch any of the harness webbing with your thumb and forefinger.
- Without loosening the harness, remove your child from the child seat.
- Take the coat off, and put your child back in the child seat and buckle the harness straps, which are still adjusted as they were when he was wearing the coat.
- If you can now pinch the webbing between your thumb and forefinger, then the coat is too bulky to be worn under the harness.
Childhood Sports Injuries: Avoid Both Common & Serious Problems
Last updated on September 7th, 2024 at 06:27 pm
The school year will soon be upon us and with the return of homework and uniforms means the  return of sports. 60 million children and adolescents participate in organized sports in the United States each year. Still more participate in informal recreational activities. Although sports participation provides numerous physical and social benefits, it also has a downside: the risk of sports-related injuries. In fact, according to Nationwide Children’s Hospital, approximately 3 million youth are seen in hospital emergency rooms for sports-related injuries and another 5 million are seen by their primary care physician or a sports medicine clinic for injuries.
These injuries are by far the most common cause of musculoskeletal injuries in children treated in emergency departments. They are also the single most common cause of injury-related primary care office visits.
I. The Most Common Sports-Related Injuries in Kids
Although sports injuries can range from scrapes and bruises to serious brain and spinal cord injuries, most fall somewhere between the two extremes. Here are some of the more common types of injuries.
Sprains and Strains
A sprain is an injury to a ligament, one of the bands of tough, fibrous tissue that connects two or more bones at a joint and prevents excessive movement of the joint. An ankle sprain is the most common athletic injury.
A strain is an injury to either a muscle or a tendon. A muscle is a tissue composed of bundles of specialized cells that, when stimulated by nerve messages, contract and produce movement. A tendon is a tough, fibrous cord of tissue that connects muscle to bone. Muscles in any part of the body can be injured.
Growth Plate Injuries
In some sports accidents and injuries, the growth plate may be injured. The growth plate is the area of developing tissues at the end of the long bones in growing children and adolescents. When growth is complete, sometime during adolescence, the growth plate is replaced by solid bone. The long bones in the body include:
- the long bones of the hand and fingers (metacarpals and phalanges)
- both bones of the forearm (radius and ulna)
- the bone of the upper leg (femur)
- the lower leg bones (tibia and fibula)
- the foot bones (metatarsals and phalanges).
If any of these areas become injured, it’s important to seek professional help from an orthopaedic surgeon, a doctor who specializes in bone injuries.
Repetitive Motion Injuries
Painful injuries such as stress fractures (a hairline fracture of the bone that has been subjected to repeated stress) and tendinitis (inflammation of a tendon) can occur from overuse of muscles and tendons. Some of these injuries don’t always show up on x rays, but they do cause pain and discomfort. The injured area usually responds to rest, ice, compression, and elevation (RICE). Other treatments can include crutches, cast immobilization, and physical therapy.
Heat-Related Illnesses

Heat-related illnesses include:
- dehydration (deficit in body fluids)
- heat exhaustion (nausea, dizziness, weakness, headache, pale and moist skin, heavy perspiration, normal or low body temperature, weak pulse, dilated pupils, disorientation, and fainting spells)
- heat stroke (headache, dizziness, confusion, and hot dry skin, possibly leading to vascular collapse, coma, and death).
Heat injuries are always dangerous and can be fatal. Heat-related injuries are a particular problem for children because children perspire less than adults and require a higher core body temperature to trigger sweating. Playing rigorous sports in the heat requires close monitoring of both body and weather conditions. Fortunately, heat-related illnesses can be prevented.
II. Preventing and Treating Injuries
Injuries can happen to any child who plays sports, but there are some things that can help prevent and treat injuries.
Prevention Basics
- Enroll your child in organized sports through schools, community clubs, and recreation areas that are properly maintained. Any organized team activity should demonstrate a commitment to injury prevention. Coaches should be trained in first aid and CPR, and should have a plan for responding to emergencies. Coaches should be well versed in the proper use of equipment, and should enforce rules on equipment use.
- Organized sports programs may have adults on staff who are Certified Athletic Trainers. These individuals are trained to prevent, recognize, and provide immediate care for athletic injuries.
- Make sure your child has—and consistently uses—proper gear for a particular sport. This may reduce the chances of being injured.
- Make warm-ups and cool downs part of your child’s routine before and after sports participation. Warm-up exercises, such as stretching and light jogging, can help minimize the chance of muscle strain or other soft tissue injury during sports. Warm-up exercises make the body’s tissues warmer and more flexible. Cool down exercises loosen muscles that have tightened during exercise.
- Make sure your child has access to water or a sports drink while playing. Encourage him or her to drink frequently and stay properly hydrated. Remember to include sunscreen and a hat (when possible) to reduce the chance of sunburn, which is a type of injury to the skin. Sun protection may also decrease the chances of malignant melanoma—a potentially deadly skin cancer—or other skin cancers that can occur later in life.
- Learn and follow safety rules and suggestions for your child’s particular sport. You’ll find some more sport-specific safety suggestions below.
Primary Treatment
Treatment for sports-related injuries will vary by injury. But if your child suffers a soft tissue injury (such as a sprain or strain) or a bone injury, the best immediate treatment is easy to remember: RICE (rest, ice, compression, elevation) the injury (see below). Get professional treatment if any injury is severe. A severe injury means having an obvious fracture or dislocation of a joint, prolonged swelling, or prolonged or severe pain.
Treat Injuries with “RICE”
- Rest: Reduce or stop using the injured area for at least 48 hours. If you have a leg injury, you may need to stay off of it completely.
- Ice: Put an ice pack on the injured area for 20 minutes at a time, four to eight times per day. Use a cold pack, ice bag, or a plastic bag filled with crushed ice that has been wrapped in a towel.
- Compression: Ask your child’s doctor about elastics wraps, air casts, special boots, or splints that can be used to compress an injured ankle, knee, or wrist to reduce swelling.
- Elevation: Keep the injured area elevated above the level of the heart to help decrease swelling. Use a pillow to help elevate an injured limb.
For Basketball…
- Common injuries and locations: sprains; strains; bruises; fractures; scrapes; dislocations; cuts; injuries to teeth, ankles and knees. (Injury rates are higher in girls, especially for the anterior cruciate ligament (ACL), the wide ligament that limits rotation and forward movement of the shin bone.)
- Safest playing with: eye protection, elbow and knee pads, mouth guard, athletic supporters for males, proper shoes, water. If playing outdoors, wear sunscreen and, when possible, a hat.
- Injury prevention: strength training (particularly knees and shoulders), aerobics (exercises that develop the strength and endurance of heart and lungs), warmup exercises, proper coaching, and use of safety equipment.
For Track and Field…
- Common injuries: strains, sprains, scrapes from falls.
- Safest playing with: proper shoes, athletic supporters for males, sunscreen, water.
- Injury prevention: proper conditioning and coaching.
For Football…
- Common injuries and locations: bruises; sprains; strains; pulled muscles; tears to soft tissues such as ligaments; broken bones; internal injures (bruised or damaged organs); concussions; back injuries; sunburn. Knees and ankles are the most common injury sites.
- Safest playing with: helmet; mouth guard; shoulder pads; athletic supporters for males; chest/rib pads; forearm, elbow, and thigh pads; shin guards; proper shoes; sunscreen; water.
- Injury prevention: proper use of safety equipment, warmup exercises, proper coaching techniques and conditioning.
For Baseball and Softball…
- Common injuries: soft tissue strains; impact injuries that include fractures caused by sliding and being hit by a ball; sunburn.
- Safest playing with: batting helmet; shin guards; elbow guards; athletic supporters for males; mouth guard; sunscreen; cleats; hat; detachable,“breakaway bases” rather than traditional, stationary ones.
- Injury prevention: proper conditioning and warmups.
For Soccer…
 Common injuries: bruises, cuts and scrapes, headaches, sunburn.
- Safest playing with: shin guards, athletic supporters for males, cleats, sunscreen, water.
- Injury prevention: aerobic conditioning and warmups, and proper training in “heading” (that is, using the head to strike or make a play with the ball).
For Gymnastics…
- Common injuries: sprains and strains of soft tissues.
- Safest playing with: athletic supporters for males, safety harness, joint supports (such as neoprene wraps), water.
- Injury prevention: proper conditioning and warmups.
III. Safety Tips for ALL Sports
- Be in proper physical condition to play the sport.
- Follow the rules of the sport.
- Wear appropriate protective gear (for example, shin guards for soccer, a hard-shell helmet when facing a baseball or softball pitcher, a helmet and body padding for ice hockey).
- Know how to use athletic equipment.
- Always warm up before playing.
- Avoid playing when very tired or in pain.
- Get a preseason physical examination.
- Make sure adequate water or other liquids are available to maintain proper hydration.
Adapted from Play It Safe, a Guide to Safety for Young Athletes, with permission of the American Academy of Orthopaedic Surgeons.
Play It Safe in the Heat
- Schedule regular fluid breaks during practice and games. Kids need to drink 8 ounces of fluid—preferably water—every 20 minutes, and more after playing.
- Have your child wear light-colored,“breathable” clothing.
- Make player substitutions more frequently in the heat.
- Use misting sprays on the body to keep cool.
- Know the signs of heat-related problems, including confusion; dilated pupils; dizziness; fainting; headache; heavy perspiration; nausea; pale and moist or hot, dry skin; weak pulse; and weakness. If your child experiences any combination of these symptoms or doesn’t seem quite right, seek medical attention immediately.
Adapted with permission from Patient Care magazine, copyrighted by Medical Economics.
Please keep your children active and safe and have a great school year.
How to Keep Kids From Getting Bit Helping with Dog Training
Last updated on May 19th, 2024 at 01:34 pm
As a professional dog trainer for many years, there are many things I have had to learn to do differently when working with the dogs around children versus what I would normally do.

Things that I would not typically think twice about, I must when kids are around…. Because they tend to copy everything – and some things may be quite dangerous for them to copy without the know-how and quick reflexes.
Some commands are simple to teach, and for those, the children can be around without encountering any issues, for example:
Sit….Stay….Down….Off
All of those commands are simply taught using some treats and simple leash work. Not only are they simple – they’re predominately safe – meaning if your child is practicing this with the pup later on, and he or she hasn’t mastered the art of “sitting”, it is highly unlikely (unless it a 180 lb mastiff and sits on your 3 year old) that there’s a hospital trip in your future
There are however, other commands that I would highly suggest teaching the dog when the children are NOT around, and show them the after-results – such as:
- Corrections of negative behaviors
- Drop It
- Leave It
There are very specific reasons these aren’t taught around children, and I will explain these in detail below. However, the one reason above all that I want to emphasize is that we train our dogs because it keeps our whole family safe, including our pup. The 3 commands I mention above (correcting negative behaviors, Drop it and Leave it), while not particularly complicated, have the potential to endanger your child if they attempt them on their own (ranging from simple emotional distress to a bite).
Correcting negative behaviors
I typically avoid teaching this when working around children because sometimes a pup may require firm quick corrections on a leash – which can cause problems for children:
- A more sensitive child can get upset when a negative behavior such as jumping on people or guarding a toy or food requires a quick, firm correction with the leash. They do not always understand that corrections of bad behavior are just as imperative as praising the positive, and that we are not hurting the pup or dog.
- On the flip side of that, a more confident or bold child may try to emulate what we are doing, but in the process may unintentionally hurt the pup or dog because they do not yet know or understand the amount of pressure required on the leash to make the correction yet not hurt the dog in the process.
Drop It and Leave It
These two commands are typically not taught around children for safety reasons. Kids do much better working with these commands after your pup has mastered them.
I also want to clarify here that when I say ‘teaching these commands’, I am not just referring to specific focused moments of training, like when you’re with a trainer, or even when you plan a specific time to work with your pup. I am speaking in general. Any time training takes place – because impromptu training takes place ALL THE TIME. You feed the dog, you want him to sit before he eats, you’re training.
You need to be careful though with impromptu “Drop It” and “Leave It” training. Remember – kids copy everything. Take for instance a dog that just grabbed the TV remote.! The dog has obviously not taken it to switch channels, so chances are it’s taken to become a new chew toy! And they are not cheap to replace! That is when our ‘protect the item’ Instinct kicks in.
Usually the first thing we do is call them to us. We are never thrilled in these moments, so the call unintentionally gets done in an angry voice (“COME HERE!!”) which clearly told Fido you are not happy with him! Of course, now that he knows you are angry, not only does he ignore your call, but he took off in the opposite direction! So what happens next? We jump up to chase them and retrieve the item back.
It is at this point that one of two scenarios ensue:
- The kids join the chase… it becomes a big game to both kids and dog, and you end up with more aggravation and pandemonium on your hands, or:
- You ran to chase the dog (which was loads of fun for the dog, as he now has your full attention and is playing the “You can’t catch me” game!) and when you finally get him, your kids see you reach in and grab the item from his mouth.
Now some time passes, and you may have forgotten all about this incident…. But your kids haven’t. So the next time Fido grabs something he should not have, such as one of their toys, your kids repeat what you did… only now the dog also remembers it, and also remembers once you caught him, you took the item away, so this time he is more possessive and guarding the item. This is behavior your child did not see last time, and the next thing you know, they reach out to grab the item back, and the dog strikes out and bites. Impromptu Drop It training gone really wrong.
So how could all of this have been avoided? We start with PLANNED Drop It training when the kids aren’t around.
The “Drop-It” command is a simple task to teach, and can be accomplished using one of their simple rope toys:
- Get them interested in a toy by playing with it with them.
- Once they are engaged in the play, bring the hand holding the toy closer to your body to stabilize it and hold it still…. This ‘discontinues’ the ‘tug’ action of the game.
- Grasp the toy with your free hand right in front of their mouth, and start creeping your hand forward, all the while saying, “Drop-It”. This forces them to lose their grip on the toy.
- As soon as they do, praise them, and begin again.
Essentially what this does is show them that you are not just taking the item away from them (which can create some ‘possession aggression’) but rather that the game can continue…. but only if they drop the item when you tell them to.
Now, let’s revisit that scenario. To start with, during the early training stages with your dog, the leash needs to be a vital part of his everyday life. Leash equals control.
- Dog grabs remote, but since the leash was on, you can step on it and then reel him back in!
- You have already taught the dog the ‘drop it’ command so the kids never see you reach into his mouth to retrieve the item.
- You can calmly tell the dog to drop it, they do, you praise them, and the moment is done.
 Now, the biggest difference between “Drop-It” and “Leave-It” is that Drop It is used when they already have the item they are not supposed to have, while Leave It teaches them not to pick it up in the first place! To teach “Leave-It” we use desirable ‘training traps’ (things that your dog loves to grab) and the leash. Throw the item on the floor, and when they run to grab it, give a quick, firm tug on the leash and say Leave-It!”. Continue doing this until you can drop the item and they do not lunge forward to get it.
Leave-It is especially important for the safety of BOTH the kids and the dog…. if you accidentally drop a pill on the floor, with the Leave-It command, they will not lunge for it. Also, if your child is eating and they drop a piece of food, using the Leave-It command will avoid the dog racing to grab it, and more importantly, the child reaching into their mouths to get it back!
My last piece of advice…. If you have not had the option to teach them yet what ‘Drop It’ or ‘Leave-It’ means and how it is done, and Fido gets ahold of something you do not want him to have, Distraction is always a great alternative. Grab a very high-value treat (a piece of cheese, a piece of hot dog, etc.) something they do not get often, but they will choose over a tasteless remote. Start off standing still and show it to them, and if they do not come immediately, take tiny steps backwards (movement is very interesting to dogs and gets their attention quicker… moving away from them means they should follow or they may miss out on that treat) Try to make it a treat or an item that they can’t gobble up in one bite, giving them ample time to return to the discarded item faster than you can. What you do not want is a race back to the original item…. I can pretty much guarantee they’ll get back there first.
I also want to note that this last piece of advice should be used as an emergency back-up plan, and not a go-to plan of action. The reason being we do not want the dog to learn that if they want a good high-quality treat, all they need to do is grab something they re not supposed to have, and we’ll replace it with something awesome!!
Being one step ahead of a potential disaster is always preferable to the alternative! So teaching your dog these basic manners when the kids are not present will keep everyone safe, happy and healthy!!!
Did You Know…Every 2 Weeks a Child Dies From a “Tipover”?
Last updated on September 7th, 2024 at 06:29 pm
 It’s not something we like to think about…and it certainly could never happen to us…but the reality is that every 2 weeks a child dies because an unsecured appliance or piece of furniture has toppled over onto them. In fact between 2000–2008, the CPSC received reports of nearly 200 tipover deaths among children 8 and younger. More than 90% of them involve children under 5!
Typically, injuries and deaths occur when children climb onto, fall against or pull themselves up on television stands, shelves, bookcases, dressers, desks, chests and appliances. Sometimes it’s the out-of-reach item placed on top of furniture, in other cases it’s the furniture or appliance itself that will topple causing serious if not fatal injuries. The CPSC has issued a warning, urging parents to inspect and secure these items. They also offer the following safety tips:
- Furniture should be stable on its own. For added security, anchor chests, dressers, TV stands, bookcases and entertainment units to the floor or attach them to a wall.
- Place TVs on a sturdy, low-rise base. Avoid flimsy shelves.
- Push the TV as far back on its stand as possible.
- Place electrical cords out of a child’s reach and teach kids not to play with them.
- Keep remote controls and other attractive items off the TV stand so kids won’t be tempted to grab for them and risk knocking the TV over.
- Make sure free-standing ranges and stoves are installed with anti-tip brackets.
One thing we often forget is that even when our own home has been thoroughly baby-proofed, our friends and family’s homes will likely not have received the same attention. It’s up to us to be vigilant…wherever we may be.
Preventing a Medication Mix-Up
Last updated on November 26th, 2023 at 07:44 pm
With the number of prescriptions that are handwritten and dispensed by pharmacies across the country each year, it should be no surprise that errors can occur. Even with the most careful doctor writing legibly and pharmacists double checking dosages, when humans are involved no amount of carefulness is error proof.
 Recently my 10 month old daughter was given a prescription from the local pharmacy with an incorrect label, instructing us to give her 5 times the amount of medication that was prescribed by her doctor. The doctor had written the prescription for 3 cc (cubic centimeters) three times per day, but the label instructed us to give her 3 teaspoons three times per day. To make matters worse, the technician at the drive-up window reiterated the incorrect instructions to my husband and showed him how to draw up the medication using a 5 ml syringe.
Fortunately, when my husband came home from the pharmacy and told me the instructions he was given I immediately knew what he was telling me was wrong. I grabbed the bottle to prove to him that he had misheard the instructions, but to my surprise, the instructions he was giving me were written clearly on the label.
When it comes to medications, errors will happen. It’s your job as a parent or caregiver to be sure that the errors don’t make it in your front door. While it’s great to have confidence in doctors and pharmacies, confidence isn’t a substitute for being an educated parent or caregiver.
When it comes to kids and medication, always follow these three rules:
- Listen to the instructions of the prescribing doctor and repeat back to the doctor the medication name and dosing instructions. If your doctor seems rushed or if you’re preoccupied with the kids, ask the doctor to slow down or to write the instructions out for you.
- Look at the label. Be sure it’s yours and confirm that the label matches the instructions the prescribing doctor gave you. Always check your prescriptions before leaving the store.
- Ask for clarification. Speak up if things don’t make sense and take advantage of the pharmacist consult that most pharmacies offer. Be sure to speak to the pharmacist, not the technician if you do have questions. If you are given a syringe to administer medication and the units on it don’t match the units on your label, ask for a different measuring tool or for the conversion.
Keep Your Kids Safe in Sports
Last updated on April 2nd, 2023 at 04:04 pm
Of the more than 38 million American kids who play sports, less than 10 percent get seriously injured during practice or a game. But that figure is steadily rising as more kids compete year-round in numerous sports activities.
Growing bones can’t handle the physical demands of so much training and playing. And if damage to bones, muscles and tendons doesn’t have a chance to fully heal, it leads to overuse injuries, according to the American Academy of Pediatrics.
The most dangerous sport is football, which sends 1 million kids under the age of 18 to hospitals, emergency rooms and doctors’ offices, according to the Consumer Product Safety Commission. Soccer is next (with 370,000 visits), and cheerleading (with 75,000 injuries) is the leading cause of serious injury to girls.
To protect your kids from serious sports injuries, prevention is key. Make sure they consistently use proper gear, do warm-up and cool-down exercises, and use facilities that are well-maintained. Check that their coaches are trained in first aid and CPR, or that there is a certified athletic trainer on site to provide immediate care that will put your kids back in the game – without further injury.
But if an accident does occur, be prepared. Here’s how to spot and treat the most common injuries in kids’ sports:
Sprains and Strains
- What they are: Sprains occur when ligaments, the tissue that connects two or more bones, are stretched or torn. Ankle sprains are the most common sports injury, according to the National Institutes of Health. Strains occur when muscles or tendons are stretched or torn.
- What they look like: Symptoms include pain, swelling, bruising and difficulty moving the joint. Strains may also cause muscle spasms.
- What to do: Give them rest, ice, compression and elevation. That usually works for mild injuries, but more serious ones may require surgery, according to the Mayo Clinic. See a doctor if your child can’t walk more than four steps without feeling a lot of pain or numbness, or if he has redness or streaks coming out from the injured site.
Growth Plate Injuries
- What they are: Growth plates are areas of developing tissue at the end of the long bones (hands, forearms, upper and lower legs, and feet). Eventually the plates are replaced by solid bone, but in the meantime, they are particularly vulnerable to injury.
- What to do: See an orthopedic surgeon immediately.
Repetitive Motion Injuries
- What they are: Injuries caused by the overuse of muscles and tendons, such as stress fractures (tiny cracks in the bone) and tendinitis (the inflammation of a tendon).
- What they look like: You can’t always see these injuries on X-rays, but they cause a lot of pain and discomfort. Tendinitis causes tenderness, swelling and a dull ache. Stress fractures cause pain and swelling that increases with activity, and tenderness in a specific spot.
- What to do: Rest the injured area, apply ice or compression, and elevate it. See a doctor if the pain persists even at rest; your child may need crutches, an immobilizing cast, physical therapy or even surgery.

